Showing posts with label Dress. Show all posts

Sunday, December 6, 2020

Chemise a'la Reine - History and Planning

 The Chemise a'la Reine, which translates to "underwear of the queen" is a very simple but beautiful dress that had a small role in changing history.

At the 1783 Marie Antoinette dared to be shown wearing the lightweight, "peasant" style garment in a painting by Elisabeth Louise Vigee Le Brun. Whether it was because the queen was seen to be in underwear, or because the queen was appropriating or costuming outside her class is unsure but it caused a big stir within all classes of France. The disapproval was so complete that the artist repainted the queen using the same base in a more aristocratic garment and the painting was quickly swapped out.  


The damage however had been done.  While this garment is certainly not a deciding factor in the french revolution it was ammunition for those apposing the rule of Louis XVI against the already unpopular Austrian born queen.

Marie Antoinette is an historical figure whose existence is shrouded by her legend, her extravagant lifestyle, the infamous "let them eat cake", a far cry from the humble last words of "pardon me sir, I didn't mean to" (having accidentally stepped on someones foot on the way to the guillotine).  We as modern people are left to wonder what is true and what is propaganda.  What is fact without question however is that she was a very real human being, who's life and death was dictated by the whim of politics.  She died as a sacrifice to the revolution in 1799 less than a month shy of her 39th Birthday.

Despite the shock when it first emerged, and quite ironically the chemise a'la Reine was taken up by Josephine, wife of Napoleon first emperor of France and inspired the regency fashion that was to follow.

But I doubt you are here for a history lesson, its about the sewing right.  Well, this dress looks to be the first project I will kick off in 2021.  I have some very clear reasons for this.  Firstly having had a baby in October I am not in what one would call my perfect shape and the ease of sizing in this garment makes it perfect for both weight gain and weight loss.  Secondly the lightweight cotton fabric is great for Australian summers, and finally because I can wear this with or without underpinnings.  The true historical silhouette will have the stays but I would rather ease back into sewing with something a bit more simplistic than stays, that and I haven't yet found a pattern I would like to make stays for the 18th century.  I am open to suggestions on that.

Speaking of patterns, i will technically be drafting this one but it will be based on this pattern found online (so sorry but I can only find it on pintrest so if someone knows who should be credited I will be very grateful). 


As you can see, it is a very simple pattern to work with, the entire dress is just masses of lightweight cotton pulled together around 2 drawstrings in the mid section and a further neck drawstring front and back with a separate shoulder piece added. The sleeves similarly are also shaped by either full gathers at shoulder or the drawstrings at elbow and lower edge.  This is to be in line with the image of Marie Antoinette.  If you are interested in making your own different sleeve treatments not only exist but are period appropriate like this extant example.
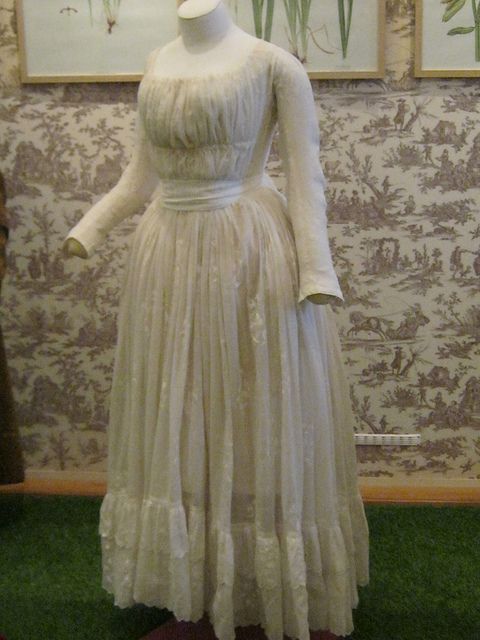


We can not see in the Queens Portrait whether her dress had the bottom ruffles but as I will include the neck ruffle I think I will go with a more plain hem.


So what we are up to now is how this fits into the goals set in previous post.

1. Challenging.

Whilst the dress is deceptively simple in theory in practice it requires meters and meters of hand sewn tiny rolled hems to be useful.  In order to achieve this the fabric must be cut 100% on the straight grain.  There is no near enough is good enough that usually tempers my efforts.  I will need to draw threads and cut precisely for this to not turn into a hemming nightmare.

Therefore the skills I am working on are being more precise in set up and hand sewing.

2. Stash items

For reasons that will be made clear in a future post this week, I am the owner of between  10 and 15m of white cotton voile that will be perfect for this project.

Need to source is only twill tape and silk ribbon.  Plus the hat stuff if I want to get the right Marie look, though I may do headwear slightly less formal than the portrait above

2020 - Realisations/2021 - Goals

 As the hell year that was 2020 comes to a close I find myself very inspired to get a whole bunch of sewing done in the new year.  How much I get through is questionable as I will be on a year of maternity leave so finding a balance between parenting, housework and sewing may be hard.  

I also have 2 goals to work on sewing wise this year, they are

1. Increase skills by working on more elaborate and complete pieces

2. Work through stashed fabric and notions

The first goal is logical, we only get better if we challenge ourselves.  The second has a sad but kind of inspiring story attached.

At the beginning of 2020, my mother passed away.  She was young at 66 and it was an unexpected loss.  I won't go into large details but sufficed to say as she was also a sewist and as I am the only relative who is also a sewist, I inherited a large amount of sewing stuff.  It is also probably relevant to point out that we were also both kinda low key hoarders with a special interest in sewing stuff, so stash mountain has turned into stash Everest.

I did let a lot of the stash go, donating to The Sewing Basket or to family friends who were making large numbers of masks given the situation with Covid.  In truth there was no way I could ever consider being able to get through it all.  But there were many many fabrics I kept, so many of them purchased with plans to make things for her grandchildren - a task I will try and complete in this year coming and others fabric she had had for a long time.  Fabric she found and liked and would use one day but never got the chance.  Perhaps the right project never did come up or perhaps it did but what if she lost weight (she was always trying to lose weight) or what if she found something more perfect to use it on.

I think we all have a stash like this, we end up buying fabric specifically for projects rather than using what we have and a lot of what we have could have been used but its like deciding between having your cake and eating your cake.  What I realised in all of this was cake is no good if you don't eat it.  Eating it is its purpose, having it is a waste.  So 2021 needs to be the year I realise the perfect project is the one I have now not the one that may or may not exist in the future.  That silver and grey brocade I have been holding onto for nearly a decade, the vintage fabrics I found at fairs all of it is useless unless I use it.  I don't want to hold onto it and then miss my chance.   

With that all in mind I have started making lists of ideas on what projects I could conquer in 2021 - Assuredly I will not get through all of this but the priority is that each project must meet both goals.  I will list them here in short form so that I can refer back to it when I finish one and move onto another.  Some of these I will expand on in planing posts so that I also have an easy reference place for all my research.  (List is being done in chronological groups)

Please feel free to comment on what projects you think would be most fun or that you would like to see or hear about.

Medieval

  • Viking Apron Dress
  • Tudor Catherine Parr 
  • Italian Renaissance Gown

1700's

  • Robe a'la Francaise
  • Robe d'Anglaise
  • Slytherin Riding Habit
  • Chemise a'la Raine

1800's

  • Regency Silk Ballgown
  • Scarlett's Orange Mill Dress
  • Linen Walking Ensemble

1900's

  • WW1 Era dress
  • 1920's daywear
  • WW2 Military Suit
Non Costume Sewing

  • Vintage inspired work pieces
  • Mums Children's wear
  • Baby Bix Baby clothing
Fixes and Finishes on old projects

  • Elizabethan Cartridge pleating
  • Cursed Green Dress
  • Blanket Dress
  • Plaid Dress
  • Toph's Victorian Coat

Monday, June 17, 2019

India Wilkes dress final

So I just realised I forget to post this one up .... after all that build up lol

Before I start I have been looking at my stats and seeing that there appears to be people all over the world you read this.  Weird feeling.  Out of interest please leave a comment about who you are and where you are from it would be nice to know who's connecting to this.

Anyway without further ado, and I believe there should be a post for each part so I won't go into to much detail in this one just an overview.  If I have missed any pieces I will go back and fill them in later.

The dress was a raging success though I am still on the hunt for a snood.  Below are some pics because I know when I am looking at blogs that's the main thing I am interested in anyway :)  Enjoy and remember leave a comment I would love to know what you think of my work.


Monday, October 15, 2018

Buttons? Buttons? Who's got the Buttons?

At last count this dress will have over 90 buttons on it.  Most of them cloth covered and only 23 of them functional  These buttons (and the phone replacement issue) account for the delay in these posts.

The plan for the buttons included around 25 functional buttons for the front of the bodice, 20 for the sleeve epaulet detail (10 per sleeve), and 8 skirt epaulets with 7 buttons each for a total of 56 - 101 buttons in total (Plus what will be used on the under sleeves).

I wanted the functional buttons to be about half an inch, smaller for the sleeve detail - but the hardest to find would be the skirt buttons.

Anyway, I went searching for buttons online.  I could have gone to the local spotlight but there cloth covered buttons are expensive at $8 for 10, have crappy plastic backs and the size range isn't as extensive as I would need.

This brought but the next issue in the planning, how to attach the buttons to the skirt and not have them flop about, I wanted them to sit flat.  Shanks on functional buttons are both necessary but also get held into position by the extra material around the button hole.  Without a button hole it flops around which wouldn't work for what I was after.

So I found on ebay a listing that had not only metal backed cloth cover button kits but came in both flat back (for gluing on jewellery apparently) and shanked.  A bit more searching and I found the website I like big Buttons and placed an order. 

I decided on the small 12mm (25), for the sleeves, 15mm (25) for the functional buttons, and huge 1.5inch for the skirt (50).  I was able to get shanks only on the functional buttons and flat backs on the rest.  You may have noticed that I had to cut down the plan for the skirt buttons because they came in packs of 50 or 100 and I didn't want 44 unnecessary 1.5inch flat back buttons on my hands.  Seemed easier on the pocket and storage to cut down each epaulet by 1 button and only need 48.

There was only one issue with the delivery which is that one of my shank backs came shankless which cut down the number I had to work with by one.  Otherwise, service was fast, friendly and the website easy to use.  I also found that the smaller button sizes were smaller than I had anticipated.  I think maybe if you flattened out the metal circle it would measure 1.5cm but the front buttons came in more the size I wanted for the sleeves and the sleeves are tiny - but we make do and I don't think it will make too much difference to the final look

Then set about the epic task of covering these bad boys.  The process is long winded enough when you have 5 to do for a dress, 89 (as the final count was) took a long time and patience that I am not well known for.  But I did promise myself that I would spend more time and effort on the finer details of the things I make so  I persevered.

To cover the buttons, first I had to cut the circles out of the fabric - a process made slightly easier by spending the extra buck on the plastic sizing tool which provides an exact template of the size that circle.  Then you stitch a run around the circle, put it in the rubber setting tool, place the metal to cover in pull the stitch tight and then push the back in with the plastic finishing tool.  To make things a bit more secure I added some craft glue between the inside and the back.  Then I did this about 90 times.


Pro tip, the bigger the button the easier it is to get the back in.  For the really small ones I used a vice, for the really big ones my own hand strength was fine.

Once all done I attached the buttons to the bodice front the traditional way (shanked) though I screwed up on spacing and will have to redo them today :(.


For the Skirt Epaulets I sewed through the the fabric where it curls under into the button.


I will provide further details of the process of making the epaulets when I do the post regarding the skirt and the one for the bodice, but for now progress continues and with only a couple of weeks to go I better get back to it.


Friday, December 2, 2011

Floral Beauty

I have previously spoken about this Butterick Pattern, in the perfect dress post, lamenting the horrid size issues I had with the wiggle version. This version I actually made first and love and it did at the time fit me. The only piece that this style shares with the wiggle is the facing and the fake cross front. I used neither when making this dress and instead reversed the full front piece to make it actually a cross over top. The entire dress was lined (due to the see through nature of voile) so the facing was also ignored. It is by this method of eliminating all wiggle dress pieces that I believe the sizing worked on this one but not the other – or as I like to put it someone in the butterick factory needs to be paying more attention. The two styles are two different sizes and nothing will convince me otherwise.

This dress was made out of a cotton voile with a blue and green floral print and some flocking (which is hard to see in photos). I saw the material (on sale as usual) for about $5 a meter at spotlight and fell in love with the blue and green colouring straight away. It was on a tall bold (150cm) and there was very minimal left (I think about 1.5-2m) but that didn’t stop me I bought it up and coveted the ideas of what outfit it could be turned into. I knew I needed a pattern that was sweet and feminine and not to fancy in its details (least it detract from the gorgeous floral), but it also had to work with such minimal yardage as I had.

Enter Butterick 6582, which I had bought originally for the wiggle dress on the front in black (so sexy). The full skirted version I noticed used deceptively low yardage and made up for it with some bias cutting in the skirt (I know that sounds odd as Bias cutting normally results in skads of unusable off-cuts but this pattern does not do that as the bias is only slight). It was everything I wanted it to be light, floaty, spring like, with enough detail in the cross front to be interesting but not so much as to be detracting. It answered all the feminine callings that my normally quite masculine brain had dreamt up for this floral. I immediately set to work.


The dress came together relatively easily considering the changes that I had made to it (creating the full cross front) and truth be told the waist did end up a little tighter for the extra bulk but not enough to be a problem and totally worth it to have the full cross front. I lined it in a light white poplin that I had lying around (75m of it lying around to be exact) and hand sewed the waist shut to hide all the internal seams.


I don’t think I did a great job with the zip but I blame that on the fact that I don’t normally use non invisible zips and I don’t think it made to much difference anyway.

When finished it somehow still looked unfinished, it needed a belt. But I felt that the traditional belt as per the pattern picture would be just a bit too much for this and decided on using left over green poplin to create a thin tie belt to cover the waist seam and give more of a waspie waste illusion.

I think all in all this is one of my favourite finished projects – I even wore it to a friends wedding about a year after it was made. It is still beautiful and waiting around for me to lose about 10kg and fit back into it.

Wednesday, November 30, 2011

50’s elegance meets 70’s Curtains – somehow all works out well


This is a dress that I made when I first set out on vintage sewing. I believe it was the 2nd vintage vogue pattern I attempted. The original pattern reminded me strongly of Grace Kelly and Audrey Hepburn. It has an inbuilt elegance about it that I found captivating (as I always do). I however do not possess the grace of Audrey Hepburn or the elegance of Grace Kelly – more closely resembling a bull in a buffalo stampede.


The pattern seemed easy enough to follow, and in truth it came out very quickly and easily. The simple lines of the 1950’s style does tend to make a dress within a day that is in no way compromising on finishes for speed. I chose to make it however out of an orange floral cotton that I had picked up for I believe about $3/m at spotlight on sale.

When I bought the cotton I had envisioned a 1960’s shift style dress and in truth the material did share some resemblance to some 1970’s kitchen curtains. I however have always had a love of the ridiculous and what some would call ugly. I find things fascinating that are not what you would call traditionally pretty, so I bought up 5 or so meters of the stuff knowing that one day I would find the right thing to make out of it. Plus I love yellow and this orange/goldenrod was close enough to qualify.

Now what made me match the elegant vintage vogue dress to the 70’s chic curtain fabric is long beyond me. Something must have made me connect the two and likely it had as much logic involved in the decision as a Salvador Dali painting, and yet somehow in the finished version it seemed to work. I have had many compliments on this dress which by all reason should be an atrocity and an insult to the eyes of every living creature. I have no idea why it works just that it does and that I really do love it.

I did have to make some small changes to the dress to make it work for me – and Ange incorporated those changes when she made her version (visible in our avatar picture on the side bar). The first was to change the back from standard buttons to the elastic button loop stuff. The machine I had at the time apparently had a one-step button hole but I’d be damned if I could figure it out. The elastic loop stuff was just easier – and since I was using non standard buttons (they are little orange flowers) the elastic is a god send.

Having said that the 2nd change I had to make was to move the button row. It actually goes at an odd angle to the edge of the dress, this is because the sizing on the pattern (and all standard patterns of modern design for that matter) is odd for my body shape. I am very front heavy but my back is teeny tiny by comparison. The buttons did make this alteration very easy to work with.

Lastly and the very visible in the picture is to change the neck line. This pattern has a very heafty amount of fabric in the gathering of the bust line. I think in the light weight floaty fabrics you would generally use this would not be a problem but in printed poplin it was. Basically as I stated above I have an impressive bust measurement that basically sits out in front and not in back – all that gathering was making me look like I was all boob.

To fix the issue I added in some small pleating to sew back the neckline side of the halter. It seemed to fix the issue nicely AND had the added bonus of looking like a feature piece of the dress.

All round I would totally recommend this pattern to anyone – it was easy to make, I can ‘t say that the instructions were easy to follow as I don’t tend to look at instructions but from memory they would be no worse or better than any standard vogue instruction page. The finished dress is fun flirty and summery, it can be adapted for both formal evening style (there is even a full length option) or for casual wear. And the biggest benefit is that being a reproduction pattern it is easily available from any vogue pattern outlet – and comes in multisize.