Showing posts with label 1950's. Show all posts

Thursday, February 2, 2017

The Elvis Dress

I have been wracking my brain to find the pattern that I used to make this dress.  Anything, even a brand but it is alluding me and with all my patterns currently boxed up and out of the way it isn't something I can easily search out.  I even tried the database I am building of patterns I own only to discover that I have wrongly catagorised a pattern as this when it obviously isn't.


However without further ado I will tell you what I do know.  This dress is made from a vintage 1950's pattern.  I think it was a mail order pattern to be honest, so not branded or numbered anyway but once I have dug it out of storage I will add the details and a photo to this post.  The features of the dress are box pleated skirt (There is one on the center front with is easy to spot and two on the back that get lost in the gathers - this isn't a mistake the pattern made me do it.)  the bust is fitted by these awesome open ended darts that I love and the neckline as per the pattern is boat.


This dress fits like a glove, no resize, no issues just on and go.  Personally I think it must be something in the design because I wore it right up to about 6-7 months pregnant and it still looked ok.  The fall of the skirt is flattering and the fit of the boat neck surprising as this is something that normally needs to be individualized.   Not just me though as I made a version of this for a friend and it fit her to and she is way broader and thinner than me.


The material I used I love, it is a clever trick of the eye where it looks from a distance kind of like a patterned striping but when you get up close - bam that's Elvis right there in one inch repeat and two awesome colours.  It is a quilting cotton that came out many years ago there was a series with elvis prints and one with Beatles prints.  I still have some Beatles heads to make something with but this is what the precious Elvis fabric was destined for..  There were several considerations (which appears to be why I have it wrongly labeled in my database) but few 50's patterns can carry a strip like this.  I needed one with a full gathered waist because I did not have the fabric to try and match striping on gores.

I like the way the zip fits in too, it is by pattern set a few inches below the neckline, very handy for people like me who screw up zip inputs all the freaking time!


I made this dress in 2011 and I still love wearing it now, I still get compliments on it and it still makes me feel just a little funky.  I remade this pattern with some changes that Christmas but I will do a different post on that one once I get some images done.

Friday, January 17, 2014

The Truth is Still a Lie - Vintage Sizing and the Modern Image

I am sure you have all heard the story.  Marilyn Monroe was a size 16.  It is touted out by every woman feeling bad on a fat day by herself her friends or internet memes....


The fun bit about this pearl of wisdom is it is true.  Marilyn (at her biggest) was a size 16.  That is she was a 1950's 16.

To illustrate my point I have made the following collage of pictures taken from a vintage pattern I have from 1957.


As you can see the size 16 is clearly printed on the front of the envelope, the size chart clearly printed on the back which indicates that a size 16 has a 36 inch bust and a 28 inch waist, which in modern standards makes a size 10 Australian.

So why is it that Marilyn has those famous curves an the modern 10 often has a more "skinny" look. Well in my opinion a lot of that has to do with style of the time.  I won't be the first person to tell you that cutting your body at its widest point will make you look wider (hello swimsuit picture above) and that the opposite is also true.  So when fashion cut at the smallest waist it helped to emphasis bust and hips (when the full skirts weren't taking care of that emphasis) and that modern fashion by comparison cuts lower on the wider part of the hip giving a more rectangular and less curvaceous look.

This is all very important to remember when working with vintage patterns.  Just because you are a size 10 doesn't mean a size 10 pattern from 1945 will fit you off the bat.  In fact you will likely have to add anywhere up to 4-5inches on all dimensions.

It is also important when looking at body image in this world.  When we let ourselves believe a falsehood like Marilyn Monroe was a size 16 we buy into a belief that we too can look like her in that swimsuit, which just leads to disappointment when we don't.

Now it is important to love yourself whatever your size and if you find you can't make the changes to get there.  If you look back to 2011 you will see I made this pattern and wore it (once only) my goal for 2014 is to get back into these size 16's.

I am aware (and I think this illustrates it beautifully) that size is only a number - however in my reality size is also a wardrobe full of home made awesome dresses just wishing they could zip up.


Thursday, January 9, 2014

Projects for the Upcoming Stash Blitzkrieg

Officially the Blitzkrieg will not start until Saturday night - because it looks like that will be the first chance I will get to sit down at a machine and sew anything.  With friends visiting from around the world, annaverysorry's and movies to see I have been hardly able to breath.  But I did take some time tonight to quickly put together some pictorials of the projects I will be working on.

8 Gored Skirts


I have 5 meters of rayon (1m each type) and I am going to make 5 of these 8 gored skirts from a 1940's advance pattern 3287.

I have made this skirt 3 times before and am close to perfecting the fit but the pattern is just lovely - especially in the soft floaty fall of this rayon ($4/m).  I used a lot of rayon to make skirts to travel around Italy with due to the not needing to iron and fell in love.  Actually I already have one in the same pattern as the orange floral but red.

Hopefully I will be able to process line these and will therefore have all of them done saturday night.  Which reminds me I had better call into spotlight for zips and buttons.

Skull Dress


Sorry the pic for this is a little smaller but the square allowed a better view of the fabric that I picked up of Ebay.  total cost was about $50 for 3m including all postage.  To be honest the fabric photographs better than it looks in person but I still really like it.  I don't have anything else like it that's for sure.

Whether I manage this as part of this Blitzkrieg or not is questionable because I am unsure if I have enough material to do it, and because I need to find a green to accent it with if I don't.  It may also be put in the when I have lost a little weight pile.  Dropping a size could cut .5m off what I need by this pattern, now there is weight loss incentive.

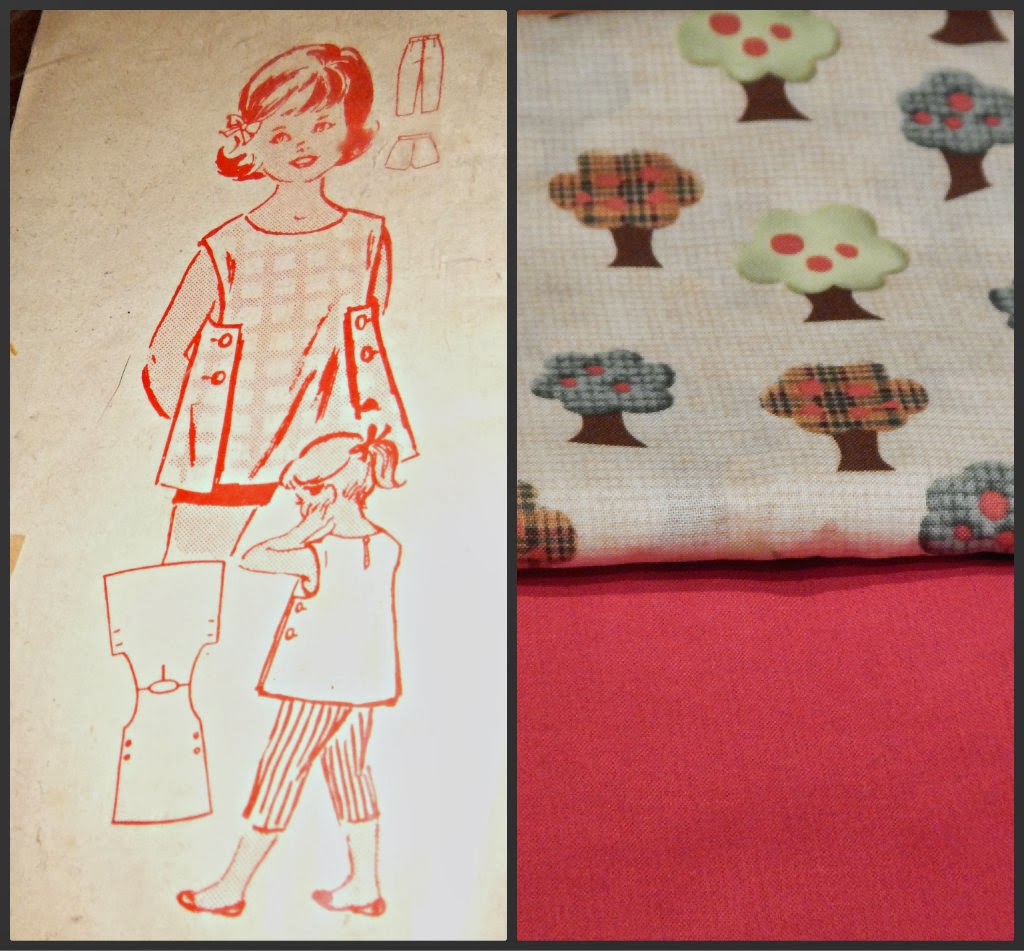
Childs Play Clothes

All around me friends are having babies, recently some are even having girls which means I can make cool things for them.  This one has been on the to do list ever since we got back from Italy and being so small I doubt it will take too much time so I am including it in this blitz.


Pattern is an old one, 1960's by my mothers guess and of a mail order variety so I am not certain of the company but I think its really cute (size 2 but kids do grow right)

The material is quilters cotton picked up on sale probably about $6 for the pattern and $5 for the plain.  I will do the top patterned and the pants plain.


So there it is 3 projects (well 7 really) and more to come.  I figure if I put the info up here I will remember what material goes with what pattern which should be useful in clearing things out.


Wednesday, January 8, 2014

The Mighty 50's Avengers

This is a catch up post - I made these dresses (with help) last Easter for a role playing convention in Sydney.

The basic costume idea was to create a visual of the avengers using a pattern of a 1950's dress.  The pattern chosen, Butterick 5603, is a reprint from I think the early to mid 50's though the butterick website is not being very helpful and I am in no way inclined to leave my bed and check the envelope.  It is universally flattering, with 3 choices of neckline and the easy fit and flare shape.  As you can tell by the picture this was quite important as we are a mutli-shaped bunch.

In terms of the pattern I have no complaints, I had made it previously (which I will cover if only to put up pictures later.)  We ended up using all 3 of the necklines though only I chose the boat-neck.

So to make this quick I will go through each "avenger" and the things done.


(left to right)

Hawk Eye
This dress was interesting, what the wearer didn't tell me was that she was pregnant and not yet ready to announce so when the first fitting was done it was a little tight on the waistline.  I had to fix it by unpicking from under bust to flare and sew with a 1cm seam allowance at that part.  The dress was done in colour blocking and has a hawkeye symbol on the front.... well most of one - She was responsible for that and she only got the two circles and missed the cross hairs.

Ironman
We used colour blocking on this too a little around the waist and then did bias neckline and the hem.  The wearer borrowed a chest piece to complete the outfit.

Captain America
This one was a doozy - we had to shorten the waistline to fit the wearer and then break it into stripes which then had to be cut in the correct colours and pieced back together again in the right order.  On top of that the stars required no only cutting out but applique to attached them... They go all the way around the hem and there is one on center back and front (the back was a mistake but not a bad one).  Lucky for me I didn't do the applique - Ironman did

Hulk (ange)
Purple and acid green looked awesome together.  This one also has the same crossfront as Ironman.  It is green bodice then purple skirt to which we added green goddets.  In hindsight I think I should have diamond pieced the bodice to the skirt but time was a factor.

Thor (me)
Obviously I have a lot of extra effort for my dress - and lucky for me I had Ironman to do the applique of the front swirls.  I also did a hem of light grey that has a piping of maroon.  Originally the caplet etc was to be red but we found that the bright red just didn't work with the grey so I went and got more maroon.  The caplet comes from a 1940's pattern but I think worked well in this setting.

All of them were made for under $20 using poplin I picked up at $2/m in Cabramatta, sure it isn't the best quality but a costume is a costume and the price was so right.

A big thank you goes out to my girls all pictured for their help and also to my friend Gav for the hammer.

Wednesday, November 30, 2011

50’s elegance meets 70’s Curtains – somehow all works out well


This is a dress that I made when I first set out on vintage sewing. I believe it was the 2nd vintage vogue pattern I attempted. The original pattern reminded me strongly of Grace Kelly and Audrey Hepburn. It has an inbuilt elegance about it that I found captivating (as I always do). I however do not possess the grace of Audrey Hepburn or the elegance of Grace Kelly – more closely resembling a bull in a buffalo stampede.


The pattern seemed easy enough to follow, and in truth it came out very quickly and easily. The simple lines of the 1950’s style does tend to make a dress within a day that is in no way compromising on finishes for speed. I chose to make it however out of an orange floral cotton that I had picked up for I believe about $3/m at spotlight on sale.

When I bought the cotton I had envisioned a 1960’s shift style dress and in truth the material did share some resemblance to some 1970’s kitchen curtains. I however have always had a love of the ridiculous and what some would call ugly. I find things fascinating that are not what you would call traditionally pretty, so I bought up 5 or so meters of the stuff knowing that one day I would find the right thing to make out of it. Plus I love yellow and this orange/goldenrod was close enough to qualify.

Now what made me match the elegant vintage vogue dress to the 70’s chic curtain fabric is long beyond me. Something must have made me connect the two and likely it had as much logic involved in the decision as a Salvador Dali painting, and yet somehow in the finished version it seemed to work. I have had many compliments on this dress which by all reason should be an atrocity and an insult to the eyes of every living creature. I have no idea why it works just that it does and that I really do love it.

I did have to make some small changes to the dress to make it work for me – and Ange incorporated those changes when she made her version (visible in our avatar picture on the side bar). The first was to change the back from standard buttons to the elastic button loop stuff. The machine I had at the time apparently had a one-step button hole but I’d be damned if I could figure it out. The elastic loop stuff was just easier – and since I was using non standard buttons (they are little orange flowers) the elastic is a god send.

Having said that the 2nd change I had to make was to move the button row. It actually goes at an odd angle to the edge of the dress, this is because the sizing on the pattern (and all standard patterns of modern design for that matter) is odd for my body shape. I am very front heavy but my back is teeny tiny by comparison. The buttons did make this alteration very easy to work with.

Lastly and the very visible in the picture is to change the neck line. This pattern has a very heafty amount of fabric in the gathering of the bust line. I think in the light weight floaty fabrics you would generally use this would not be a problem but in printed poplin it was. Basically as I stated above I have an impressive bust measurement that basically sits out in front and not in back – all that gathering was making me look like I was all boob.

To fix the issue I added in some small pleating to sew back the neckline side of the halter. It seemed to fix the issue nicely AND had the added bonus of looking like a feature piece of the dress.

All round I would totally recommend this pattern to anyone – it was easy to make, I can ‘t say that the instructions were easy to follow as I don’t tend to look at instructions but from memory they would be no worse or better than any standard vogue instruction page. The finished dress is fun flirty and summery, it can be adapted for both formal evening style (there is even a full length option) or for casual wear. And the biggest benefit is that being a reproduction pattern it is easily available from any vogue pattern outlet – and comes in multisize.

Monday, August 8, 2011

Lady in Red - My second Vintage attempt

Well there is one thing that is for certain about me and my sewing. I don't aim low!!!

It was Ange who started the vintage sewing craze (though me that started the sewing craze in general). As previously mentioned she downloaded a dress from a free internet pattern and got going on it. She was done by the time I started vintage sewing. This is to my memory the dress I chose to make 2nd. My first was the girl dress.

Vogue Vintage 2903 looks phenomanal on the cover of the pattern and to be honest I really can't fault the finished look (though in my opinion the box pleating could be a little more exaggerated on the final product).

I used a red micro crepe that I belive I picked up for about $5/m in a spotlight sale. In any case it was good ot work with.

The pattern though I do recommend with caution. Getting those sleeves in (half attached to dress half to the yoke) was a nightmare and you can stills ee how it didn't quite work.

I hand sewed the yoke in as I could not for the life of me work out how one would do that with a machine. You can see this close up but at a range it is fine. The sleeves are also a little bit tight but I think this was a fabric choice.

Technically I am half way through remaking this for a friend in an awesome teal plaid. Will let you know if I learnt anything second time round.

Christmas Dress


Well Christmas down under is generally a very very very hot occasion with tempratures reaching 40 degrees Celsius and higher (though sometimes the world decides to kick you in the teeth and we get wet cold and windy). With that in mind during stash bust last year I made a dress that although usable throughout all summer it does indeed bring to mind the wonder of christmas - in that it is indeed red and white. I give you my version of Vintage Vogues 2961.

I absolutely love this dress!!! It was made fairly quickly - I believe it took an afternoon of non stop sewing fun and required finishing before 12am to count in out stash bust.

Originally it was meant to be my Elvis dress (see post last year to see fabric). Unfortunately V2961 is not very friendly to stripes and I did not have enough material to be able to line things up (nor did I care enough). The change to the red was simply the first thing on cloth mountain to take my fancy. To be honest I think it was left over from making very fast tabards for a role playing game. A dark blood red colour poplin. The white that I used to line and accent was part of the 75m collection of white cotton we got to make togas for another game. I am slowly working my way through that stuff but I think it is going to take a while.

I think that the white and red complement each other well and the style is very flattering. (I do apologise for all the Mavis modelling photos but I put on a bit of weight this year and thus don't fit to many of my outfits anymore. But I am on my way back down so don't fret). It is technically a 1950's style but it looked great with my 1970s style white sandels for my Christmas party. Maybe I can dig out a photo from then at some point.

One of the benefits of this style is that it can be worn two ways - strapless as shown above or halter as shown here. The halter style however sits much better on a person than it does on Mavis.


So the bodice is boned which I used a real featherweight boning on, so bras is still required for wearing. I will say that the picture on the pattern is not too honest, the skirt does not seem for me to have that real 50's fullness.

In anycase as I said before I do love this dress.

Thursday, August 4, 2011

UFO Sightings

Well it has been a very long time since I got on here and did well anything. Long story but basically life got in the way and then there is the complete lack of sewing mojo. I mean sure I have made a few things since I last posted but all in all not much.


The first I call the army dress. Whilst it is technically a trial and petticoat at that I think it turned out not to bad - I photographed it here with the belt of another dress as I have not yet decided how best to "decorate" it.

I think this has been laying around unfinished for over a year. The final touches were to seal the inside lining of the bodice and to sew in a strap, that was it.

I started this because I had to resize simplicity pattern 3766 which i have in a 30 inch bust (size 12) to fit my then size 16 (36 bust) figure - (by the way these pics are on Mavis my dummy for two reasons, the first is that I had no photographer and the second is that I am now to chunky to fit these UFO's but the did require finishing non the less)

funnily enough I wore this to the engagement party (mostly finished) for a friend who will be getting married next Friday.

In any case the army dress was the trial for the petticoat to the "pretty dress". The pattern to this dress I seem to have misplaced but I am sure I will locate it at some stage. I remember buying it because it was sooooo pretty. I imagined it in a soft white with a lemon petticoat and lemon binding - and so that is what I made.

Ange also made a pretty dress - it didn't go so well in either case. The issues I have with it are as follows.

1. I am an idiot - that waist band - doesn't it look odd - well that would be because the bastard is upside down .... this dress never fit because of that - I will it seems have to turn it around but right now I don't have the patience

2. The petty coat despite being cut from the same pattern as the above army dress has a waist that wouldn't fit a 5 year old. I have no idea how I did it only that IT will need to be entirely redone.

Anyway dinner is ready so I best go eat

Happy sewing I should have more up tomorrow.

Thursday, September 9, 2010

The Boxy Dress

Hef has already told you about her version of the boxy dress here. Well this is my version, technically my post should have been first since I made mine first but, you can’t have everything.

This dress was from a Butterick reproduction pattern 4792. When I first started sewing I purchased it along with a whole bunch of other Butterick reproduction patterns when spotlight was having a half price sale. I liked it because it was retro 50’s, which was the era I was concentrating on, and also really liked the backwards halter of the top. In the drawing it looked like it may be a challenge, but it was also something different, something that made this dress unique to all the other reproduction dresses.

Admittedly this was when I had first started sewing and I didn’t realise the world of actual vintage patterns was waiting for me on etsy, or that there were other patterns out there which would suit me better, but more on that later.

I purchased some awesome orange floral cotton. The orange on it was very vibrant and so I thought it would make a great summer dress. Unfortunately the white of the cotton was not as opaque as I would have liked so I decided to line the dress in white cotton, so as to not have the orange showing through from the self lining the pattern asked for.

To do that I had to slice the bodice pieces which are designed to fold over and line themselves. Although it was a small change it added to the challenge of this dress for a very new sewer and I was amazed when I was able to do it and it all turned out right.

I had seen this dress made up before, and it looked boxy but I thought that was perhaps just how it had turned out that time. Unfortunately it was not just that girl, on my frame it did not hold any shape, and so it was dubbed the box dress. The only shape I could get out of it was if I pulled the belt quite tight, which makes it slightly less boxy but still not the beautiful nipped waist look of the drawing.

I like the skirt part on it. You can lift it all the way up and it looks like bat wings. It is soooo large! (you will see from the photos of me I like to hold my skirt up and show how large they are, hef likens it to a peacock). I think it’s supposed to have less, or at least is supposed to be gathered in specific spots, but I didn’t do that. I gathered all the way round and it seemed to be ok, like I said I was very new to sewing at this point.

I still like it, but the backwards halter top seems to make my shoulders look really prominent and it does not pull in enough for a waist. I mean I don’t have a waist anyway.

When we were doing the photos for this blog I accidently put it around the wrong way and wow it look sooo much better! The boobs were put into the back which was the only issue, that and well I was wearing a dress backwards. I’m tempted to make it that way for good, but to do that I’d have to do something with the boobs. Take a look at the pictures and let me know your thoughts/ideas. Would turning it backwards permanently make it work or do you have other suggestions on how to save this box dress.

Monday, September 6, 2010

The internet Dress

This dress is called the internet dress because I downloaded the pattern off the internet. Just because I am nice, here is the link.

It was the first dress I made all by myself. I had worked on stuff with Heather a lot but wanted to make something that was wearable without aid, so I worked on this one from start to finish alone. I chose the brown and pink polka dots because I wanted black and pink and they didn’t have any (has anyone else noticed how hard this combo is to find?). The dress was from a historical society and most importantly it was free.

The first attempt was good. It was sewn on a larger stitch than I would use now so it made it less hardy than the other ones I have. It was also made before I knew about my waist being high. In fact, it is the reason I know that my waist is higher than normal peoples. This version sits quite low for me but the subsequent version has the adjustment on it.

The dress has a bow on the back which I thought looked a bit blech, so I left it out. Also I was not really good enough to try and create it. I didn’t really know what I was doing. But I sewed it a second time and left the bow out of that because of the not liking factor.

So the problems with this dress is that the section that goes under the bust and hits the waist is too long and so it bunches in a funny way. The zipper makes it funny also. I could probably unpick and fix it now but I don’t care too much. I ended up making a belt to compensate it which works fine even though the pattern has no belt.

The second attempt was made with a bright pink floral cotton. This time I spent AGES fitting that small section to my body. It fits quite well now. I put some pink ribbon around the top and hem as a little bit of decoration. It is a great picnic dress. This one does not need a belt. The skirt is not 100% straight on the bodice which makes it look a little odd but I was still getting into the swing of the tricks of the trade at the time.

I have since made a THIRD version of this dress, which included some pattern changes, including changing the zipper to be at the side, dropping the neckline and changing the way the skirt panels were done to accommodate the new side zip. It was done for Heathers Birthday last year where 3 of us went as 1950’s Hogwarts pupils. I got told I should wear mine out as normal clothes but I don’t know about that. The picture of this dress (and the other two house dresses) can be found here.

Tuesday, June 22, 2010

Some Patterns feel obligitory

One of the things that has become very apparent since I started working with retro and vintage patterns is that some designs, no matter how flawed, seem to be obligatory to make. For example Butterick 4790 also known as the “walk away dress”, or as we have dubbed it the “deceptively evil dress from hell”, and this one Butterick 4792 or what we call the “boxy dress”.

Not quite as evil as it’s spawn of Satan cousin the walk away dress, the boxy dress has a way of unflattering even the most flattering figures. Perhaps it is just that the fit is hard to get right but in all bar one of its inceptions that I have seen on my troll through sewing blogs and review websites, every case makes it’s wearer look like they have a box sitting on their hips.

This is me in my version, a black and white masterpiece. Originally it was meant to be all in the spots but apparently the skirt requires much more material than I had anticipated – the outcome was using the white material as the top and the spots as the skirt, though I think I like it like this.

On the top of the list about the positives of this pattern is that the gathering of the skirt, which leaves flat sections across the front and back and side seams allows for a very elegant flow, the downside, if you aren’t be anally retentive about reading the pattern directions it is very easy to miss that you are meant to leave these sections ungathered. The pattern also comes with a sew in crinoline type thing but I omitted that not wanting to have to sit on tulle for the benefit of a few centimetres of lift.

On top of the long list of negatives is the top half. Sure it looks in the drawing like it should be a very interesting feature piece, with its awesome reverse halter look. It seems to be flirty, unique and by instructions simple enough for the most basic seamstress to complete with ease. Realistically, here is the picture now available on the butterick site, as you can see even a professional seamstress (as I assume the people who do the outfits for these shots are) can’t manage to get any bust/waist definition in there.

Now Ange made her version first, and she warned me, “it’s very boxy” she said. Now given that I have a hefty 8 inch difference between bust and waist I thought it would be impossible to cause me to lose bust definition, surely that was just crazy talk.

So I set forth and created this pattern, and overall I must say I was pleased with the result. There are few errors (really only one and you can’t see it in the picture anyway – its a puckered gather in the skirt I did not notice until AFTER I had hand stitched the entire lining in place and I was NOT going to unpick for one teensy almost invisible pucker), and the white top, spotty bottom with a red belt I think looks nice and classic – but as the photo proves, I too look boxy in this style.

Having now written this post though I am consumed with an idea, I wonder if it would work better in a stretch fabric? I guess I could always find out after my next Cabramatta excursion... so long as I go before August.

Tune in soon as I will force Ange to write a long expose on the evils lurking behind the “super easy” walk away dress.... that is once she finishes it, yeah a project over 12 mths in the making.